Starting up with libGDX, git and Android Studio
Starting up with libGDX, git and Android Studio

Have you ever dreamed about creating your own video game? Do you have a lot of time? Do you like to torture yourself coding in java and using Android Studio and fancy frameworks? If the answer to all these questions is yes, please keep reading. If not you can always admire the nice kitten playing with his phone.
Cause kittens can also have phones.
First of all let’s check wikipedia for the definition of this libGDX thingy:
libGDX is a free (and open-source) game-development application framework written in the Java programming language with some C and C++ components for performance dependent code. It allows for the development of desktop and mobile games by using the same code base. It is cross-platform, supporting Windows, Linux, Mac OS X, Android, iOS, BlackBerry and web browsers with WebGL support.
So libGDX is a multiplatform framework with a lot of functions. So our pretty shiny kitten related game while be able to run in almost any platform supporting the java virus.
Before reading the rest of this tutorial check if you meet up with the following list of requirements:
- You have a lot of time.
- You know basics of programming and/or you are willing to learn, or you are already the master of the universe of coding.
- You know about how digital image formats work and their representation in memory.
- You know java.
- You know how to create/manipulate images.
Note that the following steps are made on a recent Windows 10 computer, so your mileage may vary if you are using other operating systems/versions.
Take the following steps as a general guide and not like an exhaustive bible.
Step 0. Install Android Studio
I’m not going to explain how to do this, just search “Install Android Studio” in your favorite internet search engine if you don’t know how to do it. By the way the installer is huge and can be downloaded from the official Android Studio page.
Once done, continue to the next step.
Step 1. Install the java JDK
Just download the appropriate JDK for your platform from oracle.com and install it according to their instructions. I installed version 1.8 when writing this tutorial.
Step 2. Download gdx-setup.jar
This program is a wizard for generating a valid libgdx project. So we need to download it from the libGDX page.
Don’t launch it yet, we need to know first the location of the Android SDK.
Step 3. Determine your Android SDK path
We can determine the location of the Android SDK using Android Studio. The path is in Default Settings -> Appearance & Behavior -> System Settings -> Android SDK on the top part of the window.
Just copy the route to it, we will need it later.
Step 4. Creating a project
First of all we start by creating an empty folder where or project is going to be stored. There we are going to create a new git repo. This will allow us to track the different files generated by the gdx-setup.jar.
If you have not setup git yet, you must run first this 2 commands:
$ git config --global user.email "[email protected]"
$ git config --global user.name "example"
After that we can create the new folder and create the new git repo:
$ mkdir newproject
$ cd newproject
$ touch README.TXT
$ git init
$ git add README.txt
$ git commit -m "Initial commit"
Finally we execute the gdx-setup.jar:
$ java -jar gdx-setup.jar
Provide all the required information to the wizard and when finished you will have a new empty project to import in Android Studio.
Ensure that you provide the copied Android SDK route, and that the destination folder is our previously initialized git repository.
You can also choose different extensions to be installed, but if you only want to try libGDX for the first time, just use the defaults.
Press the generate button when ready, and follow the steps indicated by the wizard.
Step 5. Importing the project in Android Studio
If the defaults were used, the project will be setup using gradle. Just import the project in Android Studio, like any other project.
The project can be ran and debugged without the emulator, see the following step to know how.
Step 6. Executing the game on Android Studio
This is probably the most tricky step of all.
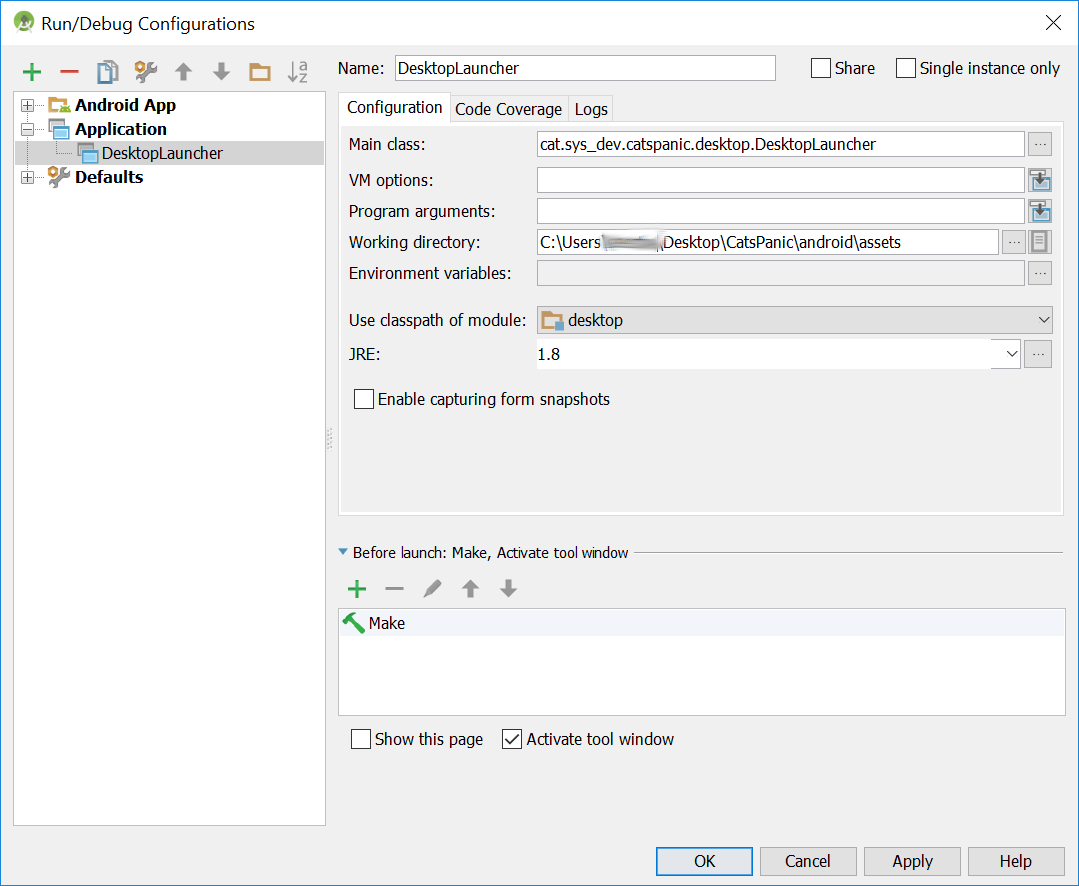
With the project loaded in Android Studied, direct yourself to Run -> Edit Configurations. Once there press the ‘+’ green button. Choose Application, write DesktopLauncher for the App name, and for the class name (Android Studio will auto-complete it). Set the working directory to /android/assets and use class-path of module to “desktop”. Finally set your JRE version.
Now DesktopLauncher can be run from Android Studio, by pressing the play button, like any other Android app, without the need of a device or emulator (it will be launched on your computer using java).
Of course it’s possible to use the emulator too, or any other Android device.
Step 7. Committing everything to git
Finally all the artifacts can be added to git using the common methodology:
$ git add .
$ git commit -m "Adding libgdx magic"
Share this post
Twitter
Google+
Facebook
Reddit
LinkedIn
StumbleUpon
Email